cool loom band designs how to make
Lindsey developed these steps for making a friendship bracelet so she could include names and numbers in her creations.
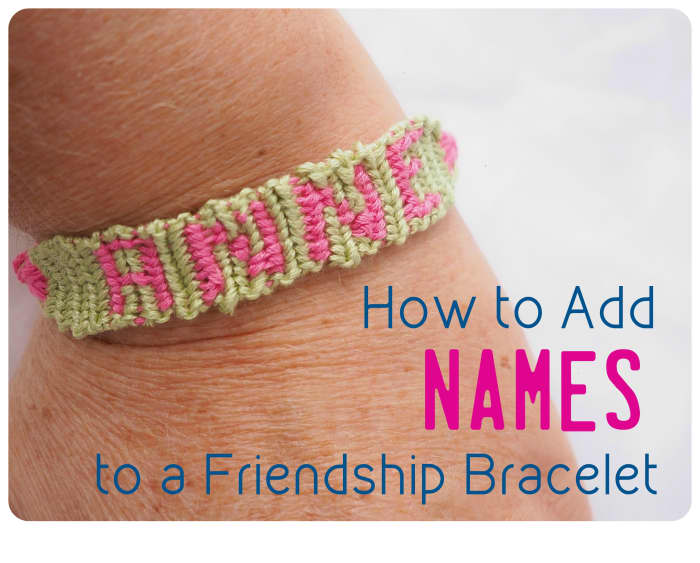
Follow these instructions to add names (or even numbers) to your friendship bracelets!
How to Make Letters in Friendship Bracelets
Have you ever wished that you could add your friend's name to a friendship bracelet? Well, you're in the right place! I created this tutorial laying out all the steps and other information you'll need to create amazing, personalized bracelets out of embroidery floss.
Think of the possibilities! Create your own design that includes names, lucky numbers, or birthdates. The only limit is your imagination (and the size of your friend's wrist)!
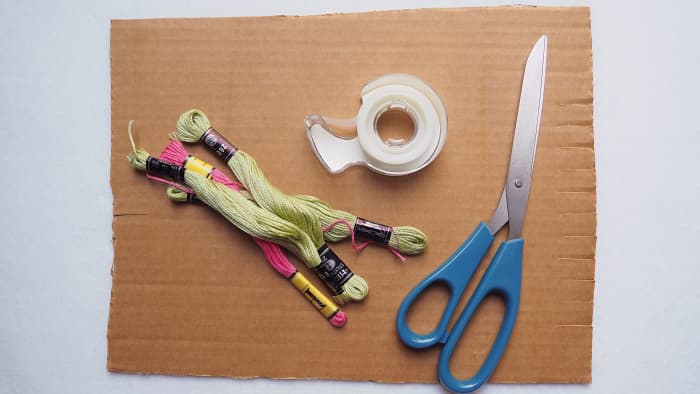
You'll need embroidery thread, scissors, tape, and cardboard (to make a loom).
Here's What You Need
Before you start, you're going to need a few things:
- Embroidery floss: Embroidery floss can be found at any craft store. So far I haven't been able to find it at Walmart or Target, but maybe you'll be lucky and find it there. It usually comes in packs of various colors, or you can buy separate skeins. The price for a pack is around $6, or under $1 for a single skein.
- Scissors
- Tape
- A homemade loom: While making this bracelet, you're going to have a lot of loose strings everywhere. To avoid getting everything tangled, I made myself a simple cardboard loom (instructions below).
How to Make a Cardboard Loom
- Get a piece of cardboard about 12 x 12 inches—a side of a box will do.
- On the top edge, cut a 1-inch slit in the middle.
- Cut 11 evenly spaced 1-inch slits along the bottom edge.
- Now you've got your very own loom and you're ready to start!
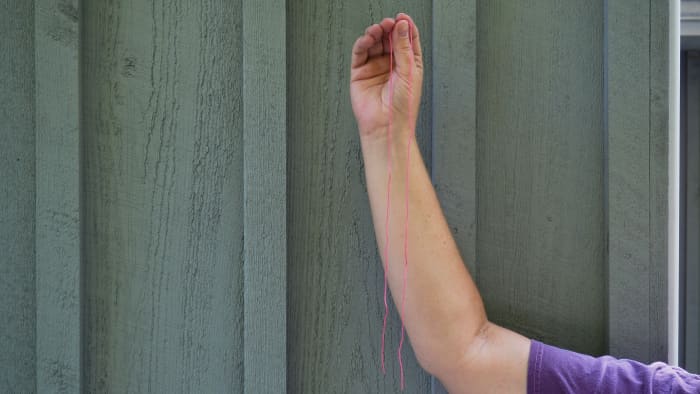
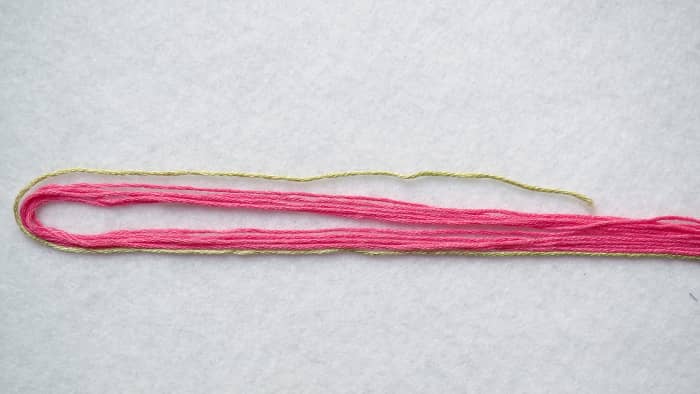
Measure the string from fingertips to elbow.
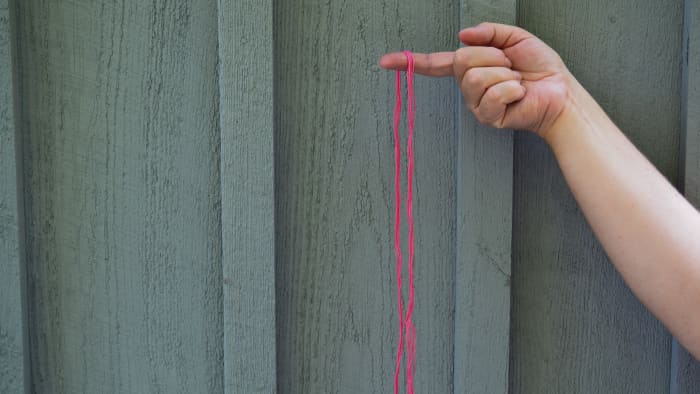
Fold the five strings in half. (thus creating ten strings).
Step 1: Prepare the Thread to Make a String Bracelet
- Pick the colors you want. If this is your first name bracelet, keep it simple and pick just two colors: one for the letters/numbers and another for the background.
- Once you've picked your colors, you need to cut your string. For a child or slender teen/adult wrist, hold the floss that will be the color of your letters/numbers and measure from your fingertips to your elbow. Once you do that, double it and cut that length. Repeat this process until you have five pieces this length. (In my example, the letters will be pink).
- For an adult wrist, measure from your fingertips to your elbows and then add another half-length of thread.
- Now, hold the floss that will be your background color and pull out some string. (In my example, the background color will be light green.) You will be using this color the most, so you need plenty of it.
- Fold the 10 letter/number strings in half. Take your background color and make a knot at the top. You may find this knot helpful to tie your bracelet onto your wrist later.
- You should have 11 strings total (depending on the size bracelet you are making). Put the knot into the top slit of your cardboard loom.
- Place each of the other strings into slits along the bottom of your loom and make sure your background color string is in the slit all the way on the left.
Join the floss together before making the knot.
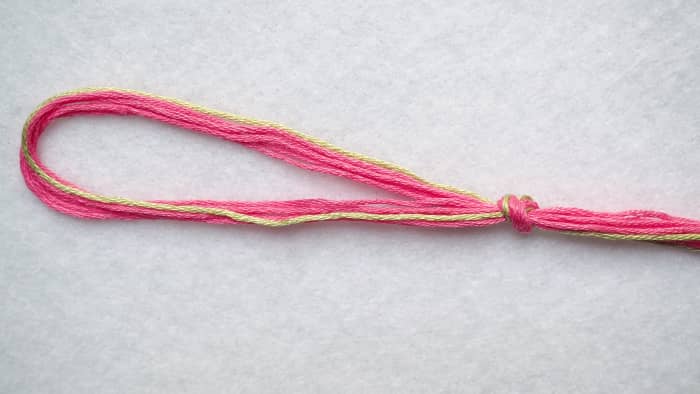
This is what your string should look like after you make the knot at the top. Remember, you should have 11 strings altogether.
Step 2: Learn Two Knots
- Backward Knot and Forward Knot
Before doing anything else, make sure you know how to do these two knots. The instructions on this site are really helpful!
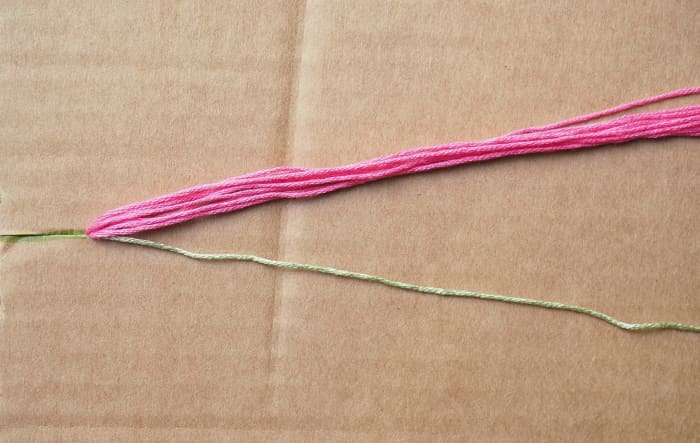
Put your knot into the top slit of your loom.
Read More From Feltmagnet
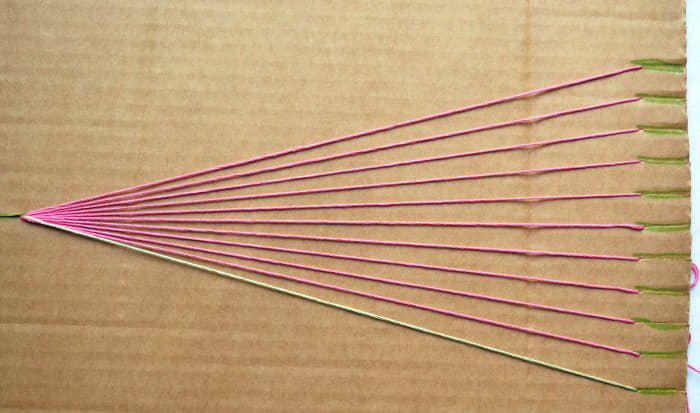
Separate the strings and pull each one down into its own slit. Make sure to put the background colored string into the slit all the way to the left as shown.
Step 3: Begin a Friendship Bracelet
The first step is to make a few rows. These rows make the background on one end of the bracelet before the letters. I usually start out with five rows of the background color.
- To make a row, take your background color (light green) and make a forward knot with the string to the right of it.
- After you make a forward knot on that string, put it in the slot to the left of its original slot. This way you know what the next string is that you need to make a knot on.
- Proceed to make forward knots on the rest of the strings.
- Once you get to the last string, you've made a row.
- Now take your background color and repeat the process, but this time in the opposite direction and using the backward knot.
- Repeat this process until you have completed about five rows.
- Don't cut your background color thread until the bracelet is done or you run out.
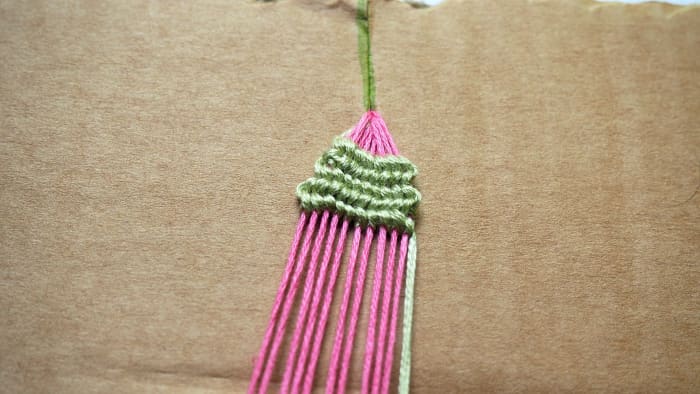
This is what it should look like after you complete five rows.
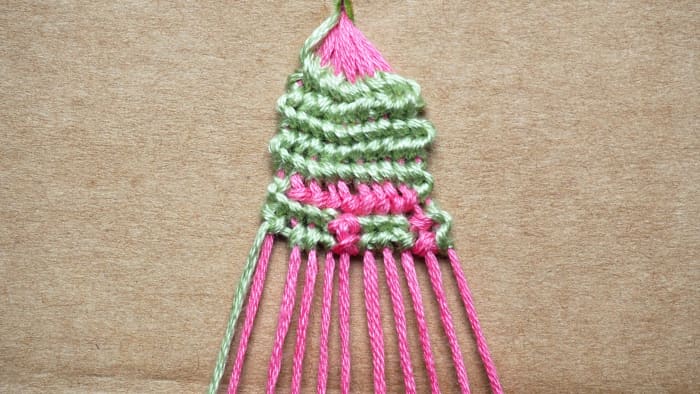
Step 4: Add Friendship Bracelet Letters
Here's a really helpful tip: Draw out how your letters are going to look first. This helps me figure out whether or not to make a backward knot or a forward knot.
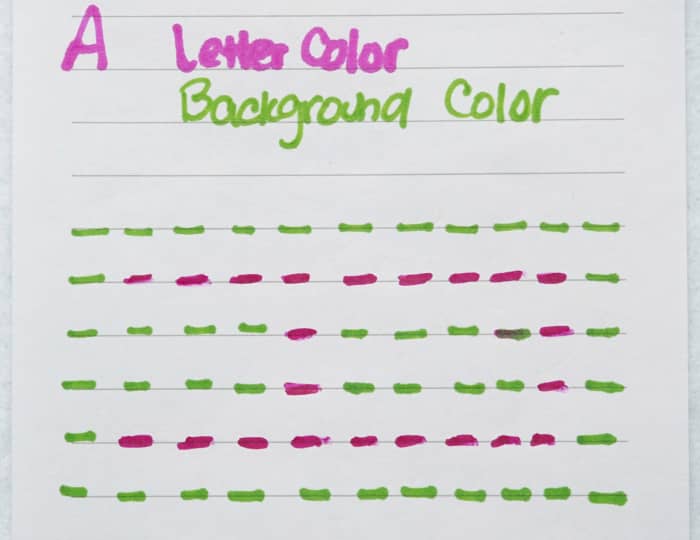
The letter on your bracelet will be placed horizontally. So I draw my pictures sideways since that is how I see them as I make them on the loom. I'll show you an example and I'll walk you through how I made my A.
- First, to draw out my A I use two different color markers and my sketch notebook.
- Looking at the picture of the A, I started by drawing the first row on the left. The first row on the left is just another row of the background color. So all ten of my marks are blue.
- On the row next to it, there is one knot of the background color first, then 7 of the letter color, then two of the background color again.
- On the third row, there are four knots of the background color, then one of the letter color, then three of the background color, one of the letter color, and then one of the background color.
- This row is repeated so you draw it again as your fourth line.
- And line five is the same as line two, so you just draw the same thing.
Drawing out your letters and numbers isn't required, but it is useful!
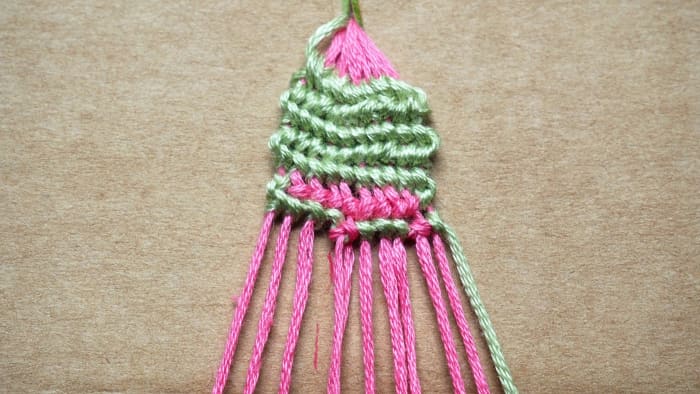
This is the first two rows for the letter A.This step of making a drawing is super helpful.
Row one of my first letter.
Using Your Drawing to Make Your First Letter
Now take a look at your drawing, and focus on the top row.
Usually, when starting a letter, the top row is a full row of the background color. You can choose to skip this if you want to. I chose to skip it for now since we made five rows of our background color.
Your background color string should be all the way to the right.
- To make my A, I need to make two backward knots with my background color string.
- Now, using the yellow string that is to the left of my background color string, I need to make a forward knot. Making the forward knot with the yellow string will make this knot yellow.
- I need to repeat this process seven times, and then I make a backward knot with my background color to complete the row.
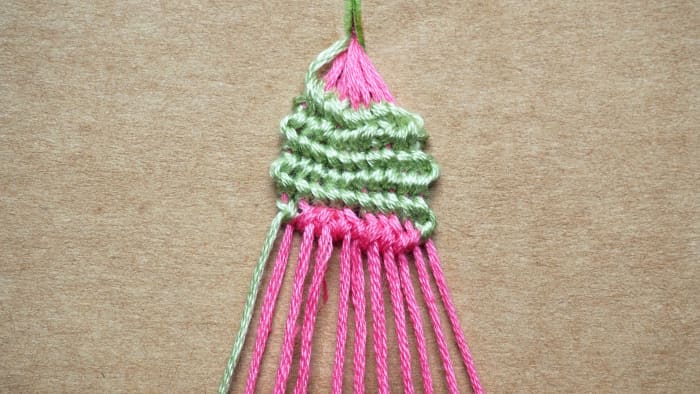
Row two of the first letter.
For my second row:
- I need to use my background color to make four forward knots.
- Now using the yellow string to the right of my background color, I make one backward knot. Using my background color again, I make three forward knots.
- Now using the yellow string to the right of my background color, I need to make a backward knot.
- Then to finish the row, I use my background color to make a forward knot.
Row three of the first letter.
For my third row, I just make it match the second row. And for my fourth row, I make it match the first row.
After your first letter is finished, you should make two rows of your background color so that there is some space between your letters.
Row four of the A is finished. The next step is to make two rows using background color for spacing.
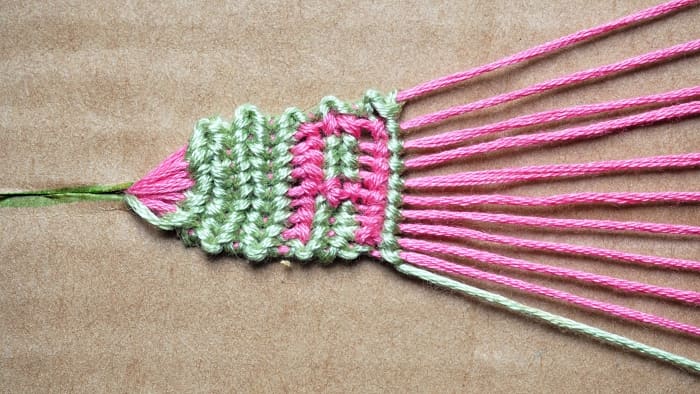
Step 5: Finish Your Friendship Bracelet
- After you have completed all of the letters you want to add, continue braiding with your background color floss until you've reached the desired length.
- Leave about two inches of threads at the end and braid them together into three separate strands.
- You can also cut the loop you made at the beginning (not to make it shorter, just to separate the threads) and braid those into three strands.
- Use these two tassels to tie your bracelet around your friend's wrist!
- Alternately, keep the loop intact and weave the braided tassels through to fasten the bracelet.
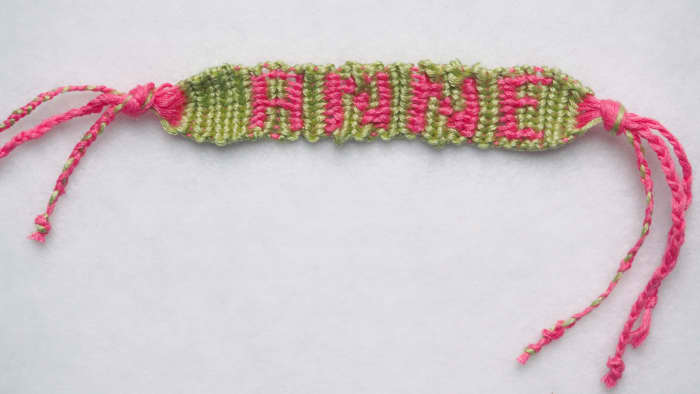
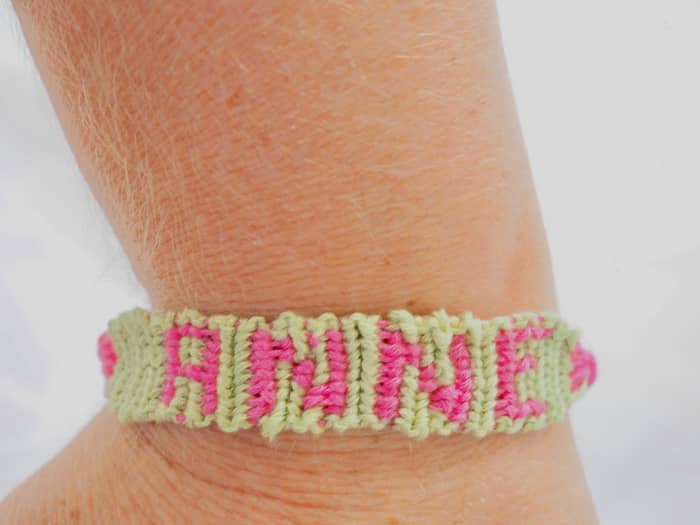
The finished bracelet.
Helpful Tips
- Make sure that you make your knots tight, but not too tight. Embroidery floss can break and it's a pain trying to work with short strings.
- Drawing out your letters will help you. I definitely recommend it.
- To tie off your bracelet, take all eleven strings and make one knot (the same knot you used before you put the threads in the loom). After you tie them off, split the eleven strings into two groups, and braid each group. now you can use these braids to tie on your bracelet.
Remember to pick a short name! Letters and numbers quickly fill up the space in a friendship bracelet.
© 2010 Lindsey
ARK on August 04, 2020:
Everyone that is asking how too spell (insert letters here), draw it out like the person did with the 'A'. I'm doing the name, JENNA, and I drew it all out the way the person showed.
HI._. on July 14, 2020:
can you make a bracelet/s with the alphabet?
Lily Anne on July 02, 2020:
Can you do a video tutorial please? I am still so confused
Victoria on July 01, 2020:
What about a J and T???? Or to spell Tanner, Jayden and Victoria?
Nay on May 20, 2020:
Hi
I think a video tutorial would be nice
zubiya on February 20, 2020:
Murud
OverAchievers on November 28, 2019:
how do you do the names kate, luke, and audrey?? could someone do a video or blog on those names??
B on October 12, 2019:
How do ya do GT on letter bracelet ????????
Bunny Carrots on September 25, 2019:
So amazing
R on September 22, 2019:
A video would be really helpful
LJ on August 16, 2019:
A video would be very helpful! Thanks for the help!
Julia on July 18, 2019:
you should make a video tutorial, it would be very helpful!
s.elizabeth on July 13, 2019:
thanks so much for the clarification!!
Hello12 on February 05, 2019:
Great Article.
Victoria Hebert on September 07, 2017:
I was hoping that you would show me how to pot the numbers in a friendship bracelet because that would be easier
pureawesomeness on June 28, 2017:
with the green string, do you cut it or do you use it till you finished the braclet?
faith on May 27, 2017:
wow! so amazing
marie on January 04, 2017:
ses très beau !!!
dragon01234 on November 05, 2016:
i have been doing friendship bracelets so long that i don't need one, however i would definitely love a friendship bracelet channel on you-tube to avoid following random beauty channels. it has happened.... a lot!
and for beginners, i think that a video alone would definitely help if the text didn't!
dragon01234 on November 05, 2016:
for length, i start out with a wingspan, it gives me enough for a whole bracelet in chevron, and i have tied on another length if i run out. just don't run out of the skein! and if you don't have embroidery thread, and you have yarn, i would use that too.
*** friendship bracelet skills are extremely helpful when you go to camp. and they provide the string too! that is where i learned more than half of these tricks. the other part was u tube, and my sister. but i have to say, this was the most helpful in helping me create patterns!!
helena on November 03, 2016:
OMG THX THX THX un belivable, now i can have a braclet that says # trekkie all the way!!
Ģggggggggg on July 10, 2016:
.do you cross the string
blah on May 09, 2016:
you should make a video tutorial
Emily on August 04, 2015:
Do you have to use the forward and barkward knot or can you just a simple 4 knot
Isabella on July 24, 2015:
THANK YOU SOOOOOO MUCH! ^.^ I made a purple and blue band for my BFF and she made one for me using this website. We had loads of fun cause at first we were using the wrong string ^.^!!! Thanks alot, you have helped our relationship grow! :)
p.s. Yes a video of making this would be nice :)
Lindsey (author) on July 11, 2015:
Would any of you like if I made a video tutorial since this post is nearly 5 years old?
kentj on July 11, 2015:
wow that was really helpful the youtube videos aren't that good. THANKS
12345hi on July 11, 2015:
This was amazing and very helpful!
(≧∇≦)miku970 on May 17, 2015:
My dad makes these, but I still don't get when to actually do the backwards or forward knot because when I tried he told me some type of knot was suppose to switch the background color to the letter color. Can you please tell me what knot it is and when to put it in?
starwarsdragon1 on December 26, 2014:
How long is the finished bracelet?
Kate on November 09, 2014:
Add more letters a no to make a smiley face
Ibidii on August 29, 2014:
My daughter made these when she was a teen, I have a vision issue so the knots would be difficult for me with the floss. I am going to try to do the knots with hemp for jewelry but not too many knots. The loom is going to help me for sure! Great hub!
Tezza23 on August 27, 2014:
Do you still make these bracelets? I've tried making one but it's for something special and I can't get it to look right and am thinking I'd be better off buying it lol.
AdG on August 21, 2014:
Wow, amazing to see someone else figured this out too -- I invented this method for myself in the late 1980s and it is almost identical to the way you do it - I use more than one background string, though (otherwise you need a very very long background string). I was making name bracelets for my friends at camp almost every day during rest hour after lunch.
Ana Maria Orantes from Miami Florida on July 28, 2014:
I like your hub . It is a good piece of work of art. Fantastic job, you are doing with the friedship's bracelets. Congratulations for your beautiful work miss lindsey.
nikhitha on July 28, 2014:
nice idea thank u for advicing me
Bex on July 10, 2014:
I know that this was posted years ago, but for all the people complaining about how it's too hard, or she didn't show how to make the other letters, this is for you. It's not an easy bracelet, she never said it was. I would not recommend this for beginners; there are much easier ones to start with until you get the process. And as for those who asked her to show how to do more of the letters, she did. There's no graph, but you can easily see how and where to put each knot using her pictures of the letters. She even suggested making your own graph, so stop being lazy and trying to make her do it. And also, and for the length of the single string, I've always found that the longer the better. Like, don't even cut it, just use the entire skein, depending on the length of the bracelet. Hope that helped all of you people from 3 years ago!
Hezekiah from Japan on June 26, 2014:
What an excellent tutorial, something to try and make with the kids. Looks a bit tricky though, I guess it needs some practice first though.
Priyanka Estambale from United States on January 22, 2014:
awesome. I loved the idea about alphabets. I have made quite a few simple chevron bracelets. I am going to try to make with alphabets.
Voted up!
tymber on December 30, 2013:
awsome
Rae Saylor from Australia on December 11, 2013:
Pretty neat stuff! Thanks for sharing these ideas, pal. Voted up!
Fletcher on October 21, 2013:
Thanks it's really cool
Avinesh Prahladi from Chandigarh on October 08, 2013:
This hub really helped me in making one. The pictorial presentation was of great help.
Nice hub, really appreciate.
Leena from new delhi on September 23, 2013:
Very informative (and good illustration) for a bracelet newbie.
mystery on September 21, 2013:
that was so informational
Chuckalina on September 13, 2013:
How tight do you make your knots?
Anna on August 22, 2013:
Thank you so much for this all my friends can actually make these and I wanted to learn how. I can now make them. It's easy to make other patterns and other things you just write what you want and put the colours on top with each individual knot. When you do a letter knot you do the knot onto the background colour. There were a few things that confused me but after reading this a few times I got it!!! Thanks for this!!! Xx
Jayme Kinsey from Oklahoma on August 14, 2013:
Very cool tutorial. I played around with the instructions and some scrap thread and it turned out fine. I did use graph paper to make the lettering and now I have a graph I can use over and over. Thanks for sharing!
Mei on August 03, 2013:
This explanation is not that bad I just think that it's a needs to say a bit more. I mean like do we use the whole embroidery floss or just some and maybe u should post like instructions to every letter cuz u only showed how to do a D and that's it. But on the other hand yes I found it very useful and it's amazing the way u manage suing letters.
Hezekiah from Japan on July 28, 2013:
Very useful, voted up.
Rambo Fen from Raipur on July 23, 2013:
It's amazing but not easy....I couldn't make one..will try again .thanks
Maddie Watkins on July 20, 2013:
Hi! I am maddie my bracelet didn't really work out the first time but it did the second time around sooooooooo THANK YOU THANK YOU THANK YOU!!!!!!!!!!
Taylor Lucas on July 19, 2013:
I'm not sure i understand how to start the letters.. How do you get the background letter to the front?
Melanie on June 13, 2013:
Wow this was helpful! It made things a lot easier than i expected. The loom and the drawings made everything so easy. thanks! (:
marie on March 30, 2013:
hey:) this sounds so cool to make but one question, is the background color supposed to be longer than the letter colors?
alo21 on March 09, 2013:
how long should the background color be?
star on February 28, 2013:
Just two questions how long does your background color have to be and how many strings of background color do you need
random on February 23, 2013:
i sooooo no how to make them now!!!!
Sarah on February 18, 2013:
Could you show the finished product? I'm having a hard time figuring out how many rows to make for a space between words.
My name is Zoe on February 17, 2013:
It is alright but it should have a video
hi on February 08, 2013:
this was really helpful thanks
Hair girl on February 05, 2013:
Hey how fast can u make 8 bracelets?
Sabeen on January 31, 2013:
Hey, its sabeen from pakistan here..... Gosh gurl! you made it sooo easy! Thanks!!!!!!!!!!! :) Takecare..kindly contact me...
Gitte on January 02, 2013:
I also just did a half knot, a back knot, and its working just fine right now
jen on January 01, 2013:
it was very helpful thanks a lot
Adrianna on December 29, 2012:
how do u get the green string to the other side after doing the row of yellow???
Monica on December 27, 2012:
Awesome! I use this so much. It is so helpful.
Mallory on December 22, 2012:
Is the color thread that is the background color supposed to be longer than the letter threads
Camille on December 15, 2012:
Hello.. How did you make the loom?
lydia on December 12, 2012:
could you show me how to make other letters??
alex on December 02, 2012:
I wad wondering how much you sell your braclets for ?!
Taylor on November 29, 2012:
This has been very helpful, but after I made my first letter somehow my knots are upside down and I am not sure how this happened and I am fairly certain I am still tying the knots the correct way, any ideas why this is happening?
michelle on November 24, 2012:
thank you so much! these instructions were so easy to follow and I am loving my bracelet so far (even though I'm only 3 letters in).
sam on October 29, 2012:
where has this site been
Taylor on October 28, 2012:
This website is useful it's awesome
grace on October 28, 2012:
thanks ive been looking for this for the longest time
Atwinmom2@zoominternet.net on October 11, 2012:
I am interested in purchasing bracelets with names on them. How long does it take to get them, and what is the cost????
toto on October 07, 2012:
Its awesome
Welcome to the Masquerade on September 29, 2012:
This is simple to me. I am 13 but despite the young age this made complete sense. It should be clear though that this is not a bracelet for beginners. The lengths also could be more specific because I ran out of background string on my first bracelet. Otherwise it is a good website and easily understood. Thank you.
anonymous on September 09, 2012:
thankyou so much! am running a small business and doing names is going to boost the sales massively! to those asking about length, for the background colour i use one string about 15 times the length of a finished bracelet, and for each of the strings used for lettering, 3 times the length of a finished bracelet, folded in half. i am a visual learner so the pictures in particular helped! may i suggest www.how-to-make-friendship-bracelets.com it gives basic structure for those confused. thankyou again, this website was so useful! :)
Elizabeth n on August 28, 2012:
Thanks this really helped before I read this I thought I was new how to do it but I did everything the opposite I had 10 background colours and 1 letter colour thank you!
bcd on August 26, 2012:
i do not get the how to make the letter & i try to discover the pic. but i still do nto get it
Brittany hearn on August 24, 2012:
how do u make the b
anonymous on August 21, 2012:
if u don't have cardboard, use the back of a composition notebook. it works gr8. thx 4 the loom tip!
Amena on August 18, 2012:
when i do my letters it looks better on the bsck thsn the front like i did the knots wrong. any tips ?
on August 13, 2012:
Now it looks so easy
gymnastics on August 12, 2012:
how do u make the letters ALY
Kaitlyn on August 04, 2012:
What measurement should the Loom be?
Amanda on August 02, 2012:
how would you make a ♥ ...?
ocnj on July 29, 2012:
thanks this really helped
Sydney on July 27, 2012:
Trying to learn the knots made me cry. I wish you had made learning the knots a lot easier
doolallysally on July 21, 2012:
Hi I have just started making these friendship bracelets with my niece and finding this site was brilliant. I'm sorry but I can't believe some of the reply postings and wonder how Lindseyjo can refrain from answering sarcastically.
First of all I will skate over all the obvious spelling mistakes.
Next the background green colour/color is always being used, whether you do a forward or backward knot, it is always the one being used, so no need to thread it through the back or whatever. You will need a lot of that colour, I try and use the whole bunch and then trim it at the end. Use 2 lines of background inbetween the letters, as suggested. This is a very good and informative website, you just have to have patience to read and follow it through. Definitely draw out the letters as suggested, you don't just need lindseyjo's step by step 'A' guide on every letter, they've given you a photo of all the letters and numbers, spend a bit of time working it out for yourself! The rewards are there. And if you can't understand it yet, maybe you're not quite ready, do a bit of practise of the easier bracelets before you try this one.
Angelica on July 19, 2012:
This might sound like a dumb question, but I really want to know how to do it; In the picture where you say that our string should look like this with the knot on top, how did you make that knot?
:F on July 18, 2012:
Tip: if making a long name, use string to like your forearm of shoulder. It is easier to work with longer strings than short ones. Also, space your letters one row apart and 3-4 between words
Sweetness on July 14, 2012:
Ow, man did that ever help me out!! Very helpful...
Marissa on July 13, 2012:
Really helped a lot especially the blue and pink markered drawing. thanks!!!!!
teresa on July 11, 2012:
im like 11 and i have been making bracelets for like ver and ive always wanted to do my name. i have a small business w/ my bff for 1 dolla i think that making names would be like worth i don't know 5-7 dollars. its hard work! thanx so much i learnd lots. pictures were awesome. im a visual learner
Ash on July 11, 2012:
is it possiable to do a heart in the string?
Ally on July 03, 2012:
How long do you need to make the background string?
Lucy on June 21, 2012:
How long do the strings need to be???
cool loom band designs how to make
Source: https://feltmagnet.com/crafts/How-to-make-friendship-bracelets-with-letters-and-numbers-on-them